ShopDreamUp AI ArtDreamUp

Deviation Actions
Synaptic Fragments
A view of how my Alien-Hybrid imagination stumbles through this existence via rough sketches and ideas.
$2/month


Suggested Deviants


Suggested Collections


You Might Like…


Featured in Groups


Description
There are many ways to turn a sketch (even a veery quick one) into an artwork. Here is the way, I'd suggest:
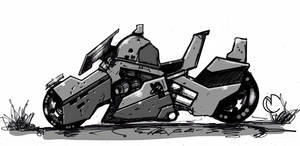
01.: You got your sketch. First of all, you copy it into a new layer and give it the attribute multiply. This layer will always be the top one.
It does not really matter, if the perspective is correctly drawn or not, but there should be a shadow on the ground, because everyone should immediatelly recognize the function!
The easies way to create such a shadow is to suppose a mainlight shining exactly from the top.
As you can see, I drew vertical lines from every corner of my spaceship down to the ground, and where the line of a corner hits the ground, I drew the corner of the shadow. That might sound a bit confusing, when you hear that the first time, but there should be an other tutorial which only covers this topic. Lets continue!^^
02.: Next, you create 3 new layers between the top one and the background-layer. T
ake the first one and fill it in any color you want. In this case I took some sort of darker green.
Take the upper one and paint the outlines. When you are satisfied, you can hide the sketch-layer on the top.
Then you select the one in the middle, take a thick brush and fill the outlines with another color (lighter green in this case).
I always choose to paint very sloppy first, and erase the strokes that go over the outlines. Thats much faster^^.
03.: The object itself will have some further shadows. Create a new layer, give it the attribute Luminance and paint your shadows black. My personal advice is to use a soft and big brush, and paint over the shadowed areas, and at the corners you use a smaller and hard brush for erasing, where there should not be any shadows. Feel free anytime to play around with an layers opacity!^^
04.: We do the same thing with the light areas: Luminance-layer; soft, big brush - this time we use white instead of black; hard small eraser.
05.: Finally, you create another Luminance-Layer and paint the highlights. I'd suggest to use a smaller, hard brush this time.
06.: Take the layer which includes the object's color and give it a clipping-mask with the attribute color.
In this layer you can add any color you want to appear on the shell. In this case, I decided, to leave the bottom areas green, because they are reflecting the ground and added some blue in the top areas because of ...?
exactly! -the reflection of the sky!^^
Now you can use the same technique to colorize the background-area. Another luminance-layer would be a good joice, because the area which is behind should appear a bit lighter (fog).
So we used a lot of layers in this tutorial. That is, because now, you can colorcorrect every single of them. If you say, you want lighter higlights, you can just make them lighter, or give some texture to the shell without influencing the highlights.
That is a very useful thing and it is great fun to continue playing around with corrections and effects on every single layer!^^
So cyas next time and sleep well!
Image size
1364x5842px 430.67 KB
© 2012 - 2024 gregor-kari
Comments6
Join the community to add your comment. Already a deviant? Log In
one thing you MUST have a very clean sketch